Handling Auth in Serverless APIs
In the last section, we created a Serverless REST API and deployed it. But there are a couple of things missing.
- It’s not secure
- And, it’s not linked to a specific user
These two problems are connected. We need a way to allow users to sign up for our notes app and then only allow authenticated users to access it.
In this section we are going to learn to do just that. Starting with, getting a understanding of how authentication (and access control) works in the AWS world.
Public API Architecture
For reference, here is what we have so far.
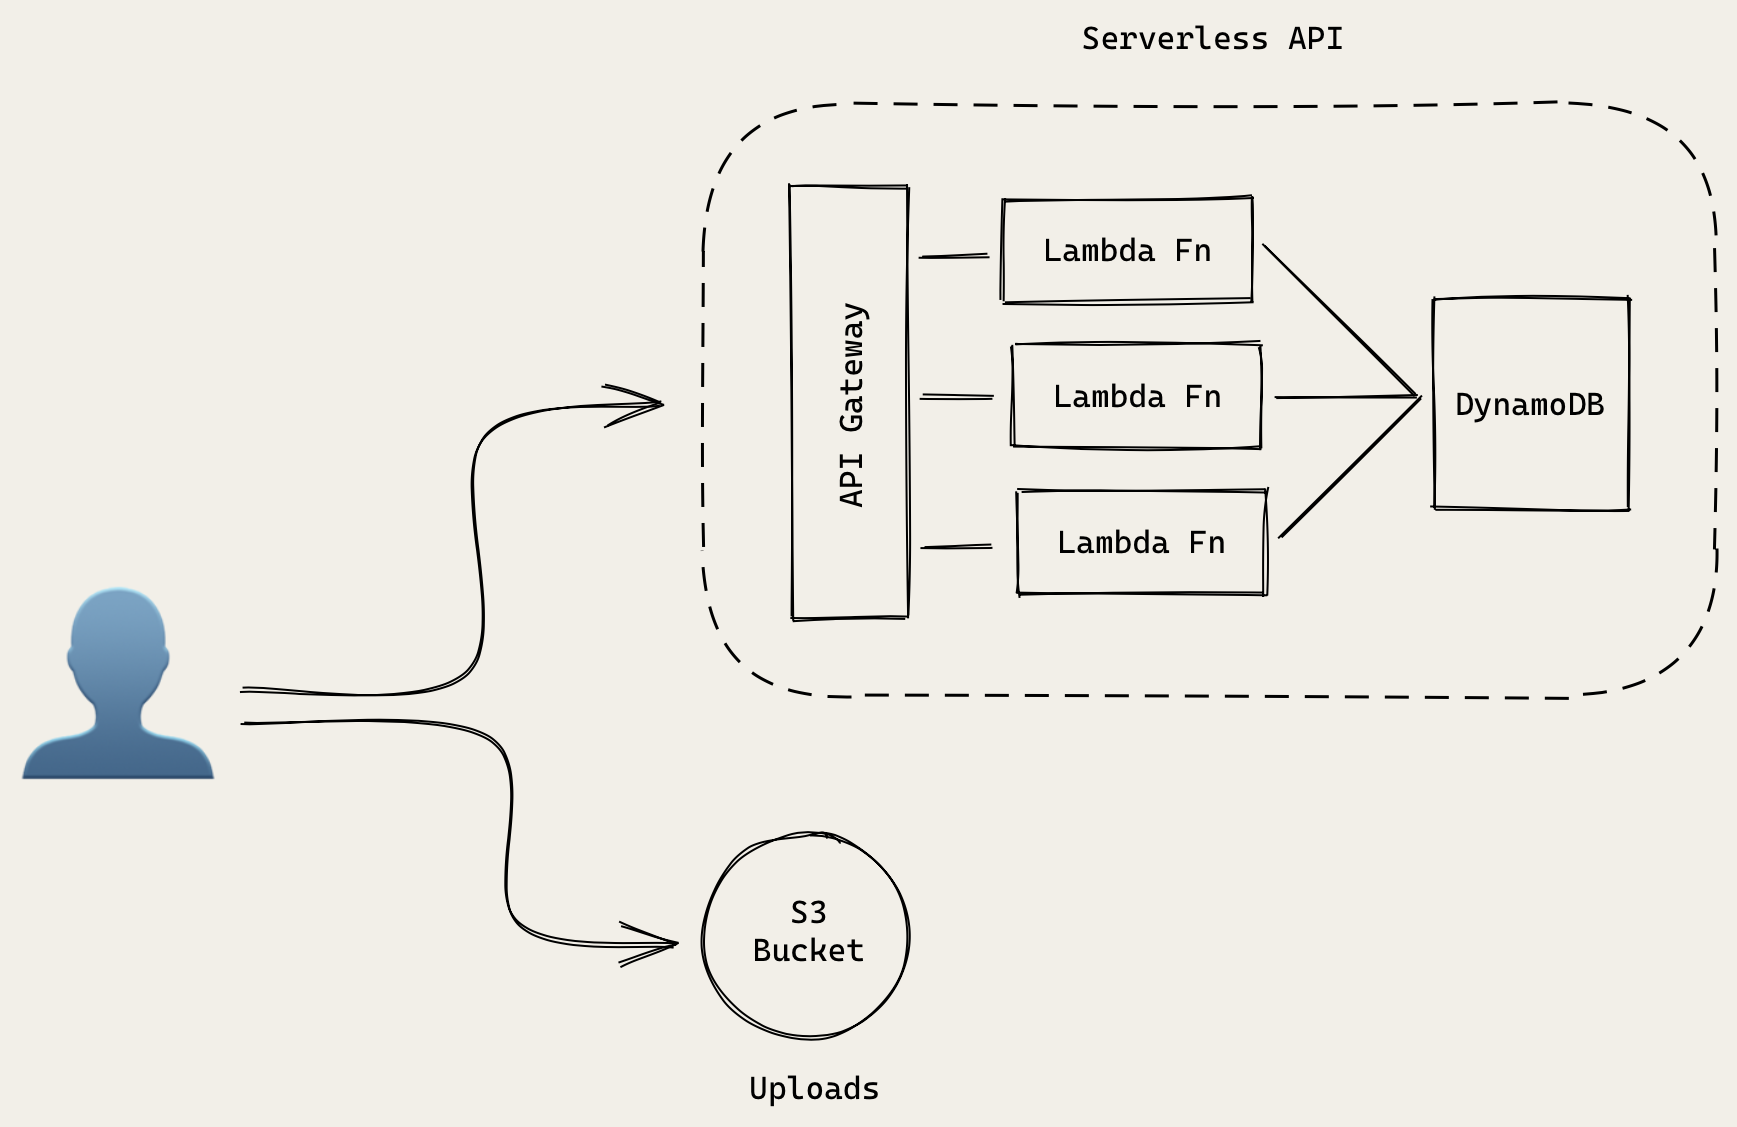
Our users make a request to our Serverless API. It starts by hitting our API Gateway endpoint. And depending on the endpoint we request, it’ll forward that request to the appropriate Lambda function.
In terms of access control, our API Gateway endpoint is allowed to invoke the Lambda functions we listed in our serverless.yml. And if you’ll recall, our Lambda function are allowed to connect to our DynamoDB tables.
Here is the relevant block from our serverless.yml.
  # 'iamRoleStatements' defines the permission policy for the Lambda function.
  # In this case Lambda functions are granted with permissions to access DynamoDB.
  iamRoleStatements:
    - Effect: Allow
      Action:
        - dynamodb:Scan
        - dynamodb:Query
        - dynamodb:GetItem
        - dynamodb:PutItem
        - dynamodb:UpdateItem
        - dynamodb:DeleteItem
        - dynamodb:DescribeTable
      Resource: "arn:aws:dynamodb:us-east-1:*:*"
For uploading files, our users will directly upload them to the S3 bucket. While we’ll look at how our frontend React app uploads files later in the guide, in this section we need to make sure that we secure access to it.
Authenticated API Architecture
To allow users to sign up for our notes app and to secure our infrastructure, we’ll be moving to an architecture that looks something like this.
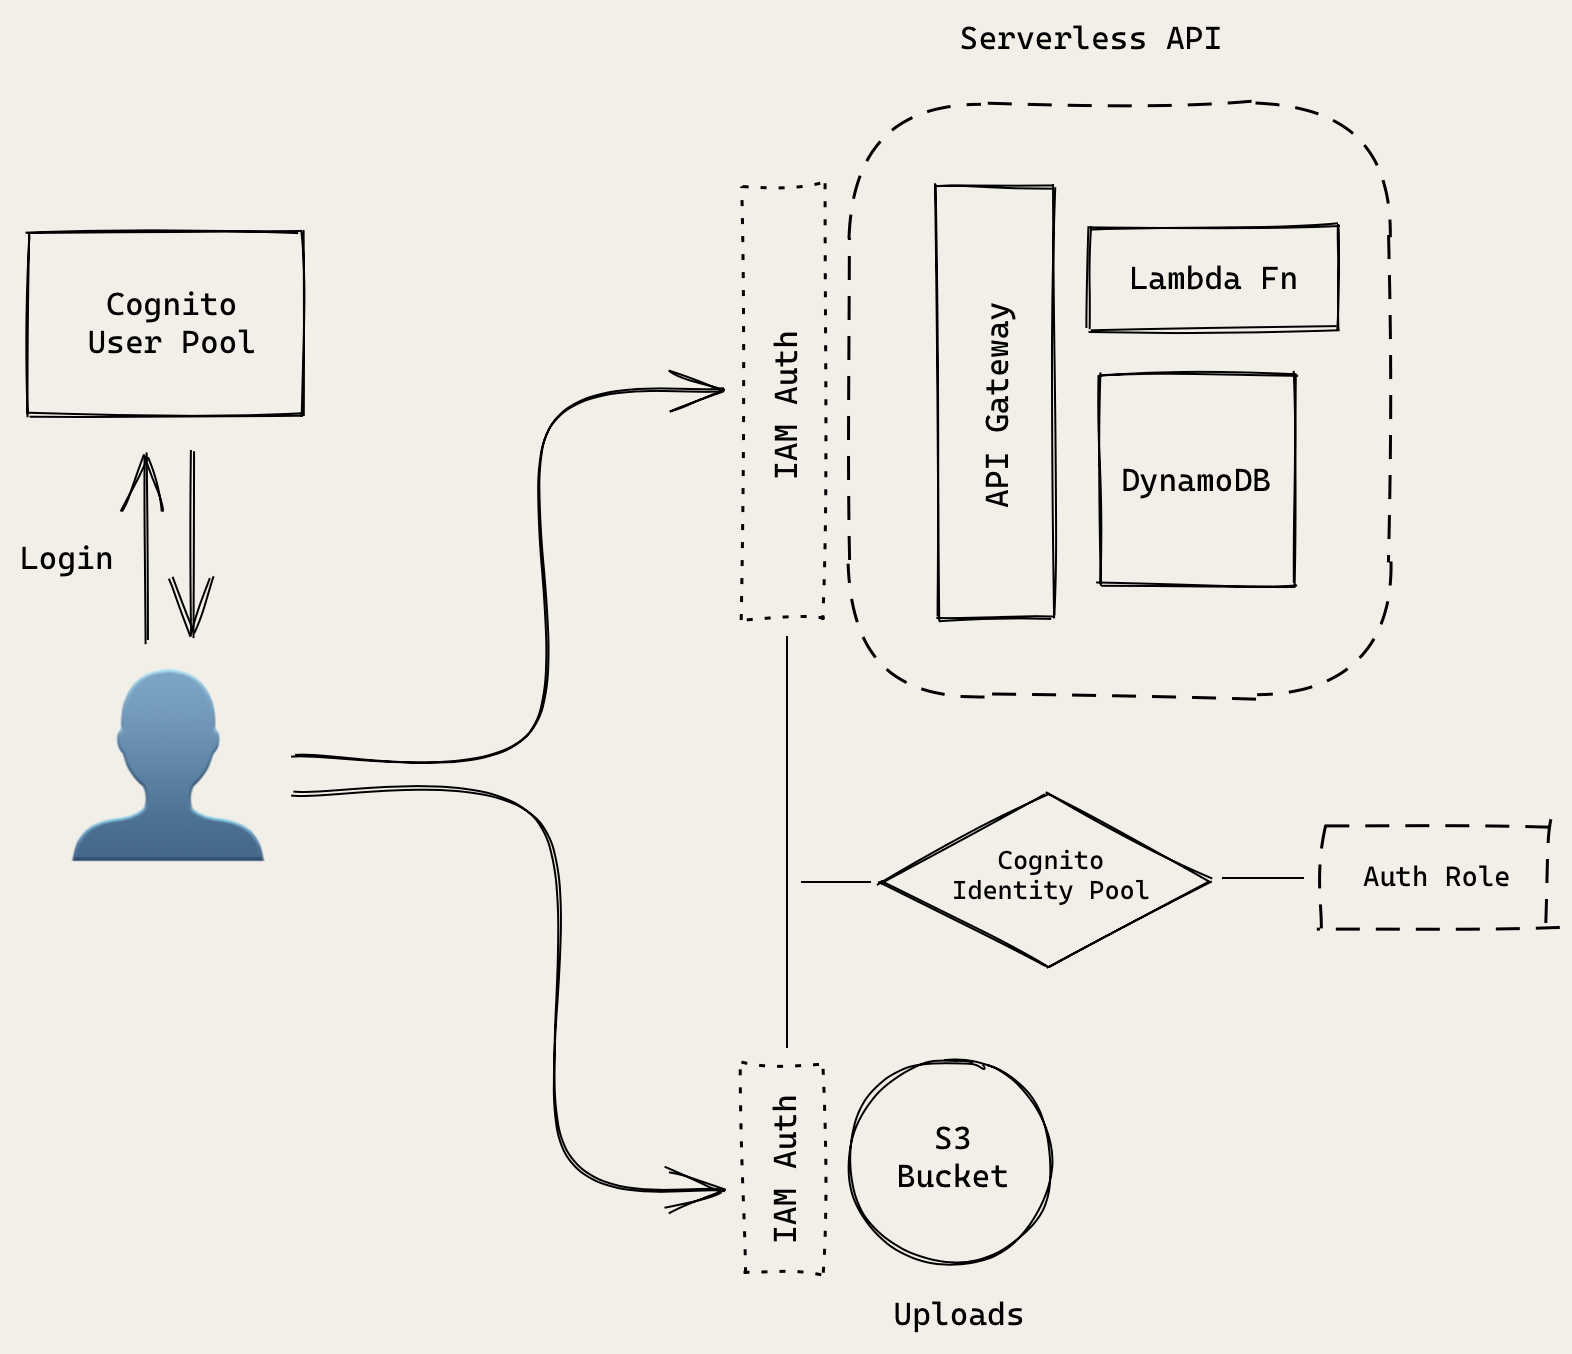
There’s a bit more going on here. So let’s go over all the separate parts in detail.
A couple of quick notes before we jump in:
-
The Serverless API portion in this diagram is exactly the same as the one we looked at before. It’s just simplified for the purpose of this diagram.
-
Here the user effectively represents our React app or the client.
Cognito User Pool
To manage sign up and login functionality for our users, we’ll be using an AWS service called, Amazon Cognito User Pool. It’ll store our user’s login info. It’ll also be managing user sessions in our React app.
Cognito Identity Pool
To manage access control to our AWS infrastructure we use another service called Amazon Cognito Identity Pools. This service decides if our previously authenticated user has access to the resources he/she is trying to connect to. Identity Pools can have different authentication providers (like Cognito User Pools, Facebook, Google etc.). In our case, our Identity Pool will be connected to our User Pool.
If you are a little confused about the differences between a User Pool and and Identity Pool, don’t worry. We’ve got a chapter to help you with just that — Cognito User Pool vs Identity Pool
Auth Role
Our Cognito Identity Pool has a set of rules (called an IAM Role) attached to it. It’ll list out the resources an authenticated user is allowed to access. These resources are listed using an ID called ARN.
We’ve got a couple of chapters to help you better understand IAMs and ARNs in detail:
But for now our authenticated users use the Auth Role in our Identity Pool to interact with our resources. This will help us ensure that our logged in users can only access our notes API. And not any other API in our AWS account.
Authentication Flow
Let’s look at how the above pieces work together in practice.
Sign up
A user will sign up for our notes app by creating a new User Pool account. They’ll use their email and password. They’ll be sent a code to verify their email. This will be handled between our React app and User Pool. No other parts of our infrastructure are involved in this.
Login
A signed up user can now login using their email and password. Our React app will send this info to the User Pool. If these are valid, then a session is created in React.
Authenticated API Requests
To connect to our API.
- The React client makes a request to API Gateway secured using IAM Auth.
- API Gateway will check with our Identity Pool if the user has authenticated with our User Pool.
- It’ll use the Auth Role to figure out if this user can access this API.
- If everything looks good, then our Lambda function is invoked and it’ll pass in an Identity Pool user id.
S3 File Uploads
Our React client will be directly uploading files to our S3 bucket. Similar to our API; it’ll also check with the Identity Pool to see if we are authenticated with our User Pool. And if the Auth Role has access to upload files to the S3 bucket.
Alternative Authentication Methods
It’s worth quickly mentioning that there are other ways to secure your APIs. We mentioned above that an Identity Pool can use Facebook or Google as an authentication provider. So instead of using a User Pool, you can use Facebook or Google. We have an Extra Credits chapter on Facebook specifically — Facebook Login with Cognito using AWS Amplify
You can also directly connect the User Pool to API Gateway. The downside with that is that you might not be able to manage access control centrally to the S3 bucket (or any other AWS resources in the future).
Finally, you can manage your users and authentication yourself. This is a little bit more complicated and we are not covering it in this guide. Though we might expand on it later.
Now that we’ve got a good idea how we are going to handle users and authentication in our Serverless app, let’s get started with creating a Cognito User Pool.
For help and discussion
Comments on this chapter